Showing posts with label paint. Show all posts

Friday, 3 October 2014

learn: Spray Painting Techniques with Vanessa Pritchard


Step 1
STEP 1
Using a canvas I start by painting the sky, sunset or landscape. I use acrylic for this as it need to be quite strong and to stay put for the next few stages. This paint needs to be bone dry before continuing with the next step.


Step 2
STEP 2
Out on the lawn I have spray paints (silver, gold and white) as well as a spray bottle of diluted white and a full spray bottle of water.


Step 3
STEP 3
I spray the whole canvas with water then for this particular piece I proceeded to spray silver and white spray paint. (Sometimes for warmer tones warmer landscapes or a sunset). This is to give the effect of clouds/snow. If there is too much spray in an area, spray more water onto it.

I love how organic this process is, and even on a windy day, the spray paint moves round on the layer of water. I never really know the final result until it dries. Leave the canvas totally flat until it is dry.

NOTE: too much water and spray paint can dry to be very textured (like in this picture). I had to sand it back before painting the cat.


Step 4
STEP 4
This is my favourite part of the process. Painting the background darker, using the organic shapes left by the spraying. Here I used watercolour pencils, for the clouds I used white acrylic paint using a small slanted brush.

Sometimes if the canvas is ever so slightly damp, the watercolour pencils blend easily. Rubbing a damp cloth can also be used to take off some of the spray. If I use a lead pencil, I dampen it so I'm not left with a pencil sheen.


Step 5
STEP 5
Now now ready to paint the little characters onto the canvas. I usually place a pencil drawing (cut out) to position the animals then trace the shape. Using a variety of mediums such as house paint, acrylics, pens and pencils I add the finishing details.


Finished Artwork by Vanessa Pritchard

My artworks are often inspired by my family. I am one of triplets, and exactly two years ago I lost my sister, my best friend and my life companion to ALS - Amyotrophic Lateral Sclerosis (In Australia it is commonly known as MND Motor Neuron Disease) so this art piece for 'Words' theme was dedicated to her.


Vanessa Pritchard :)


Friday, 2 May 2014

learn: In-Process Painting with Sheryl Gwyther

Beware of Greeks Bearing Gifts - oil pastels and gold leaf on canvas

When painting, I use a fairly loose style in the beginning to get basic shapes down, then layer colour until it's what I'm after.

With oil pastels, you mix on the canvas - so if I want a good solid shadow, I use one of the browns and ultramarine crosshatched, then mix a little with my fingers. You have to be careful to not do too much dark colour to start or you won't get the paler shades down successfully.

You can use gum turps to lift colours, but that muddies things, and it's much cleaner to get it down the right way first.

Colour is one of the loves of my art life. If anything, I tend to go overboard if I'm not careful. I wanted this to be a little more muted than my usual work. It took two days to complete.

Hope you enjoy it! For more of my art, check out my web page - sherylgwyther.net


#1 Laying out the basic design over a used canvas, thinking about colours ...


#2 Focusing on the horse and its components ...


#3 Shadows and building up horse structure ...


#5 Using the underpainting as part of the painting for the clouds and landforms ...


#6 Trying different wheel positions ...


#7 Changing wheels, building up night background, laying down gold leaf ...


Final image - wheels changed again, more shadows, scratching in ladder ...


Detail from painting ...


Sunday, 2 March 2014

learn: Watercolour in-process, with Tania McCartney


This week, I finally painted something I'm kind of proud of. It's this image, below.


I'm kind of proud of it because it came directly from my imagination, and I made it by utilising the watercolour skills I've learned these past two months. It's also because it's the first imagination image I've done that anywhere near equates what I saw in my head.

It was a breathtaking feeling to see something in my head appear on paper. So often, what we see inside doesn't appear in real life, and I can't even tell you the joy it brings.

I tried another illustration directly after this one, and I hated it. I thought too much about it and didn't trust my intuition and flow. Watercolour, in particular, needs intuition and flow. So I waited a day and this afternoon produced another image, at the top of this post.

I know these images aren't genius, but trust me when I say they are so much better than I ever thought I could produce. It's like something has been switched on in my brain and my hand is suddenly able to produce images I'm proud of--but more than that--images that connect with my heart.

As I revisit a long-forgotten part of my earlier life, and self-teach techniques that hone my craft, one of the things I'm fascinated by is the 'process' artists go through to create. Not being an 'artist', I thought I'd nonetheless show you the steps I took to create the green image. You might find it helpful for your own artistic quest!

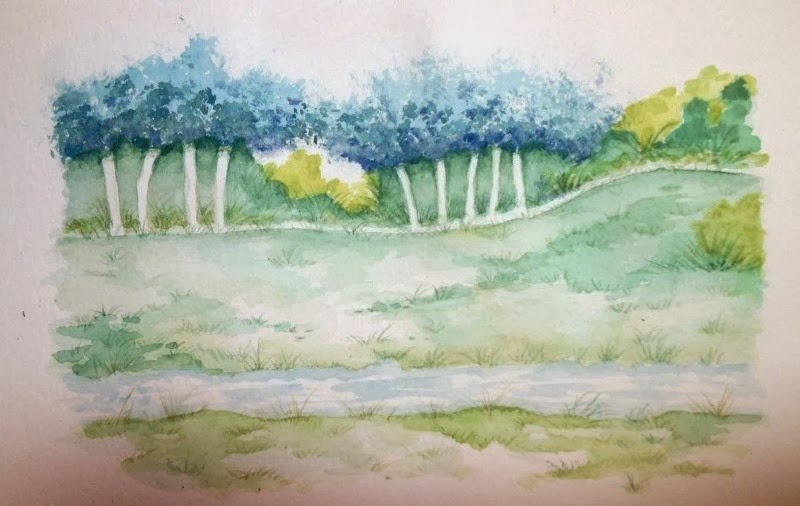
I start with a light wash to delineate the landscape ...


Then I add a far distant background, with negative space for tree trunks and natural dips and rises on the land. The page is very wet with water at this stage, and I use that water to nestle pools of paint along lines and into shadows.


I then begin layering colour. I do this on both wet and dry paper. You can also put the colour down, wait until it's almost dry, then use a brush with a little clean water to 'pull' the paint around and make it fade or blend. You'll see here, I also stippled a blue base for the tree foliage. The paint was quite wet, then I let it dry.


Next, I continue to add extra layering--shadows.


Then I use darker blue paint to stipple shadow on the tree foliage.


Once the image is dry (you can use a hairdyer if you're impatient), I use watercolour pencils to start adding definition and grass detailing. You can then use a damp brush to soften these lines or smear them, creating more background colour. You can see I've done that with the yellowish grass on the right ...


At the bottom of the image, I continued adding grass to the greener areas.


To finish off the base scene, I added some blue pencil dots around the top of the trees and also ran water over the river, to smooth the ripple lines. The paint was dry by then so it only smeared slightly, which is what I wanted.


Here is the final image, before I added the boy ...


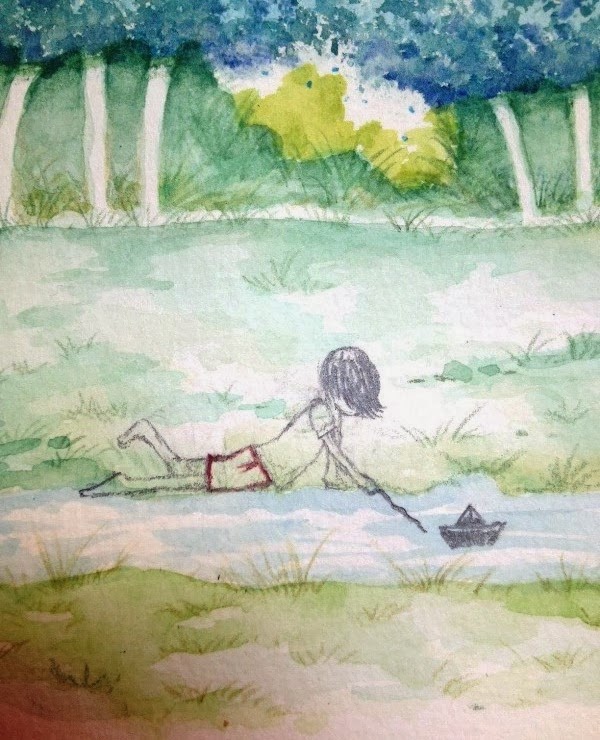
Typically, I get very nervous about drawing people, so I practiced him first on a piece of cartridge paper, then I drew him in. I actually changed his position as I drew him in, so he was lying down.


I then rubbed out most of the pencil until it was very faded, and painted him in, I always think about where the light is coming from, and ensure I have lighter spots where the light falls.

Et voilĂ  - here is the final image, again. I know I still have a long way to go, but I really like it, and it feels so wonderful to create something you resonate with.


Are you interested in joining in the 52-Week Challenge? We'd love to have you! See the Facebook group right here.